How to Delete Screenshots on Mac – Best 3 Easy Ways

We all take screenshots for different purposes, but one thing is certain. It’s an extremely handy feature for any device. Whether for sharing a piece of content, keeping references, or saving an instance from a particular time, taking screenshots has become a regular thing. So if your devices are overflowed with screen captures taken from time to time, you’re not alone. To lay off some, let’s learn how to delete screenshots on Mac today.
Related: How to Delete Shared Albums on iPhone
When you take a screenshot on a MacBook, it’s saved on the desktop by default. While it takes up as little as around 1 MB, too many of these images can end up using a lot of storage. Therefore, it’s essential to know how to delete multiple screenshots on Mac for consistent performance. Let’s get to the details in a bit.
How to Delete Screenshots on Mac | 3 Simple Ways
The process of how to delete screenshots on a Mac consists of two very easy methods. But first, you need to know the location where screenshots are saved by default. Apple makes it easy by saving new screenshots onto the desktop. You can locate and move them to your Mac’s trash bin and later delete them permanently.
Related: How to Delete YouTube Search History on iPhone and iPad
With Mac, you can either capture a particular area of the screen or the entire screen using the Screenshots app. It’s a convenient inclusion where you can also access and take screenshots using keyboard shortcuts. Once a screenshot is taken, it’s instantly saved on the desktop right in front of you, making it effortless to find out.
How to delete screenshots on MacBook Air and MacBook Pro
- On your Mac desktop, locate the screenshot you want to delete.
- Right-click on the image to open the menu. Then click “Move to Bin.”
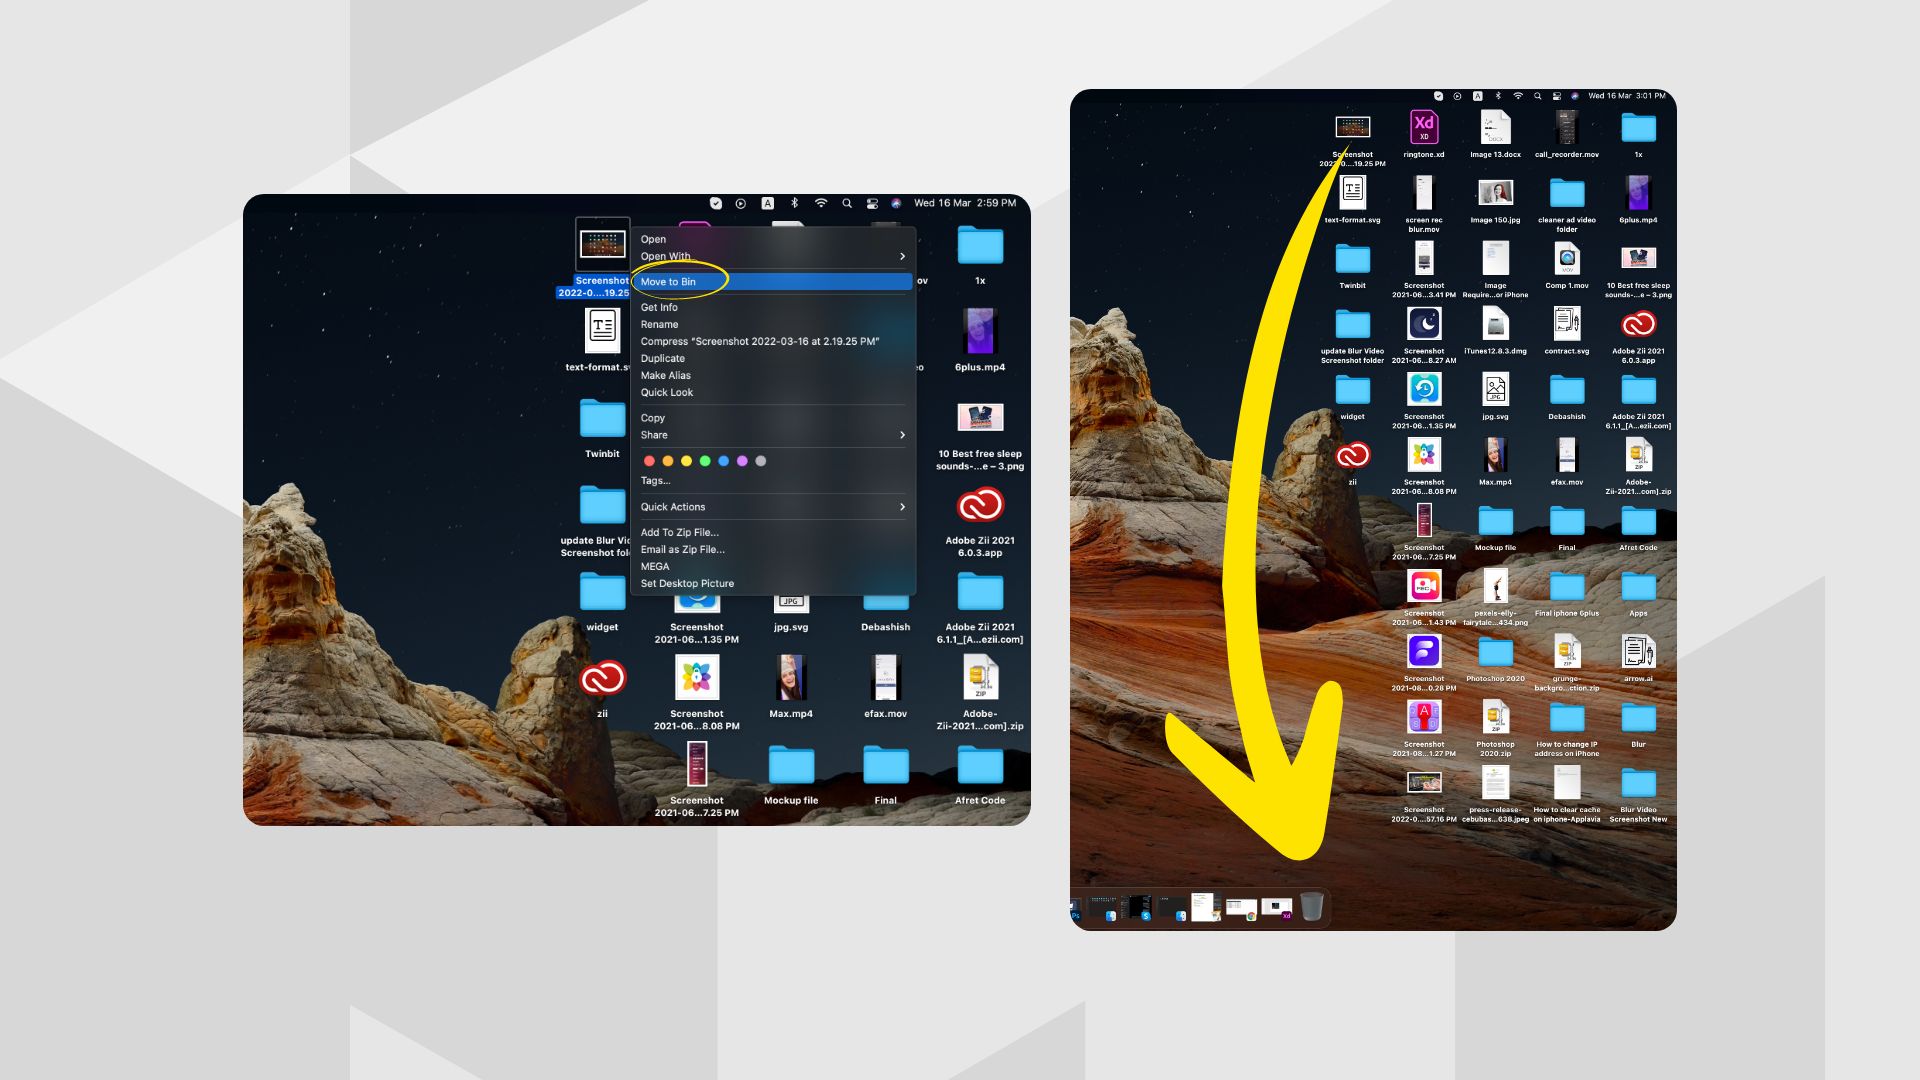
- Alternatively, you can click and drag the image to the Bin folder as well.
- If you want to delete the files permanently, right-click on the Bin icon and select “Empty Trash.”
How to remove screenshot from desktop on Mac
When you capture the screen of your Mac, a preview window will pop up on the corner of your desktop. It hovers there for a couple of seconds for you to edit, delete, or save the taken snapshot. If you don’t like the screenshot stuck on your Mac screen, you can always turn this preview off. You’d have to open the inbuilt Screenshot app on Mac and tweak a setting to disable this floating window. Here’s how—
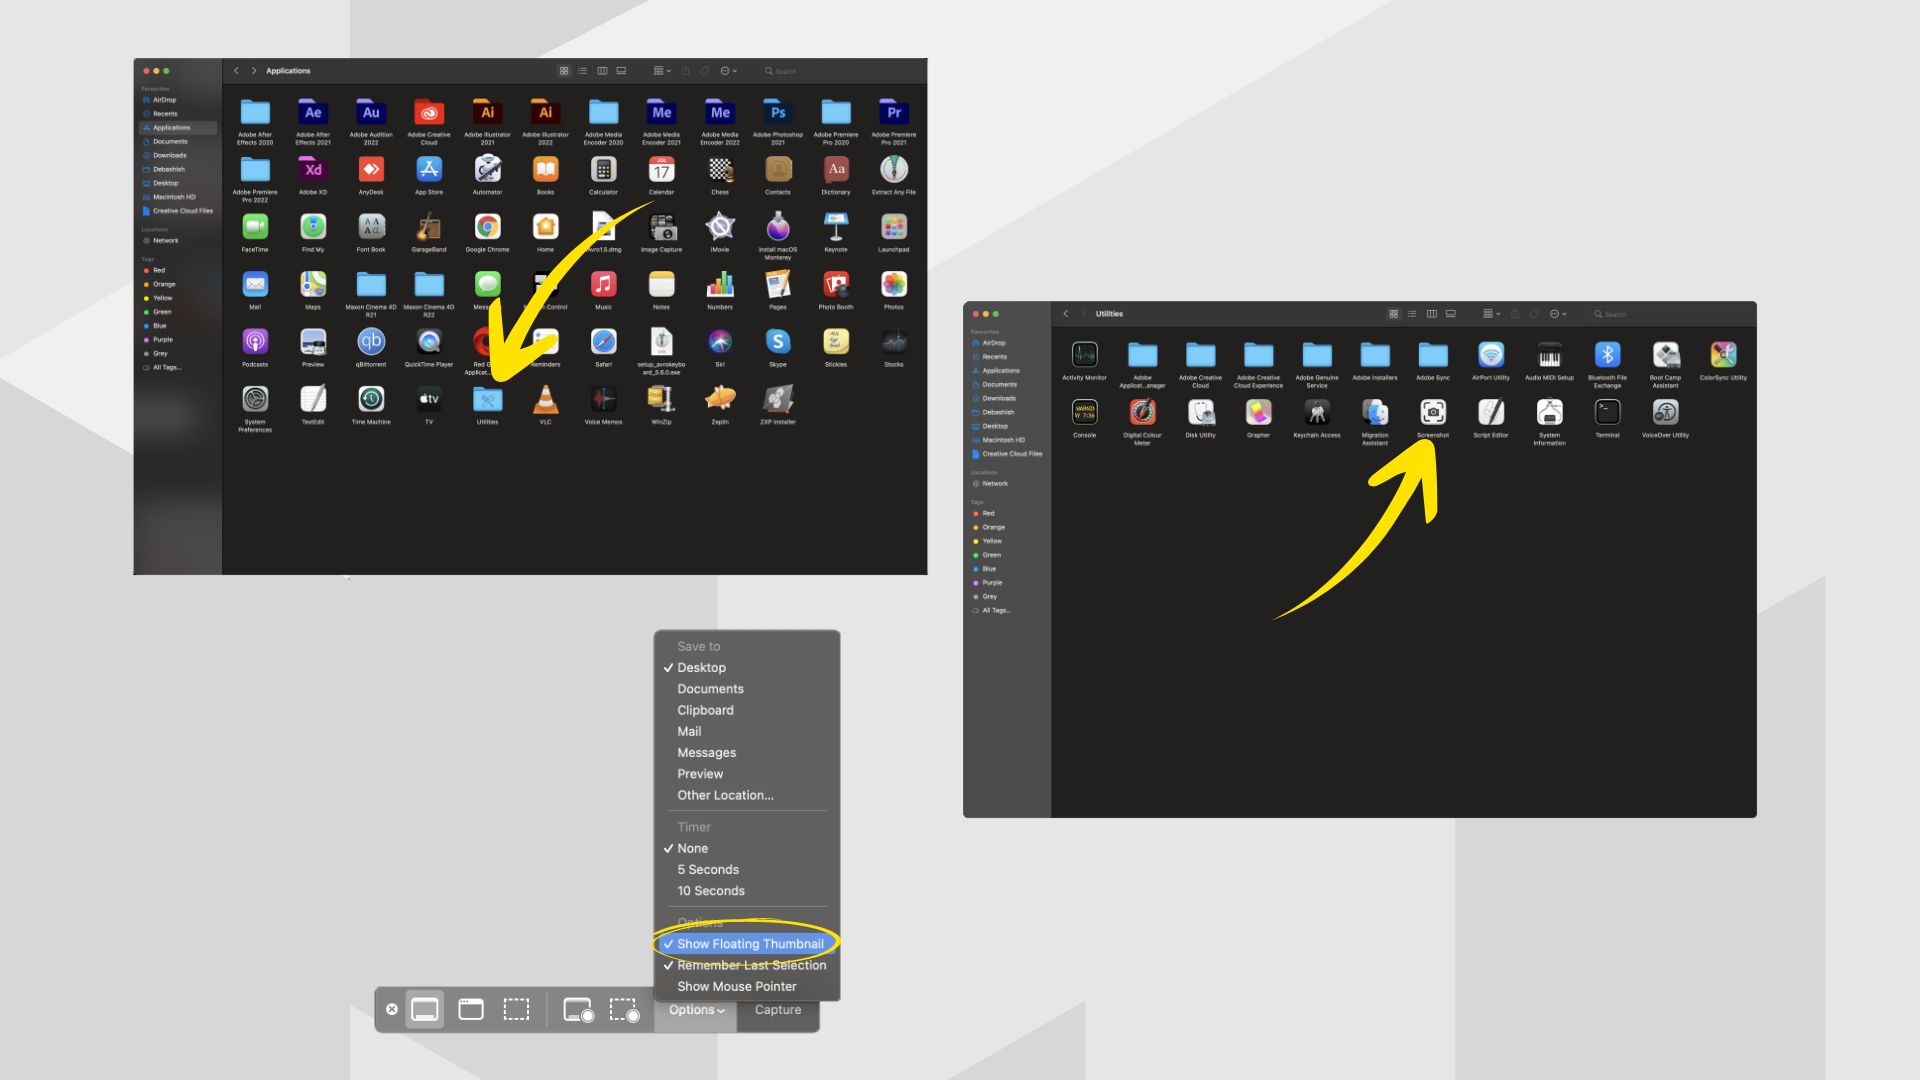
- Open the Finder app on your MacBook.
- From the sidebar, go to Applications.
- Then locate the Utilities folder and enter.
- Next, open the Screenshot app.
- From the bottom menu, hit Options.
- Finally, uncheck the option for “Show Floating Thumbnail.”
How to Delete Screenshots on Mac using keyboard shortcut
Depending on whether you want to remove a single screenshot, several screenshots, or a specific portion of a screenshot, there are several keyboard shortcut methods for doing so. You can try the following techniques:
- To delete one screenshot, select the screenshot you want to remove from your desktop and hit Command (⌘) + Delete. This will move the screenshot to the Trash.
- For deleting multiple screenshots at once, use your Mac’s Stacks feature to put all of your screenshots in one group so you can delete them all at once. To activate stacks, utilize the keyboard shortcuts Control + Command + 0. Next, to transfer them to the Trash, press Command (⌘) + Delete.
Note that when you move screenshots to the Trash, they are not permanently deleted from your Mac. To delete the screenshots permanently, press Option + Command (⌘) + Delete.
How to take a screenshot on MacBook
We’ve learned how to delete all screenshots on Mac; now, let’s talk about taking a screen snap. Screenshots can be superbly helpful for many purposes: sharing work progress, saving current project status, referencing to a point, a lot you can do by sending what’s on your display. So how do you take a screenshot on a MacBook easily? Using your keyboard, of course.
How to take a screenshot on a MacBook Air and MacBook Pro
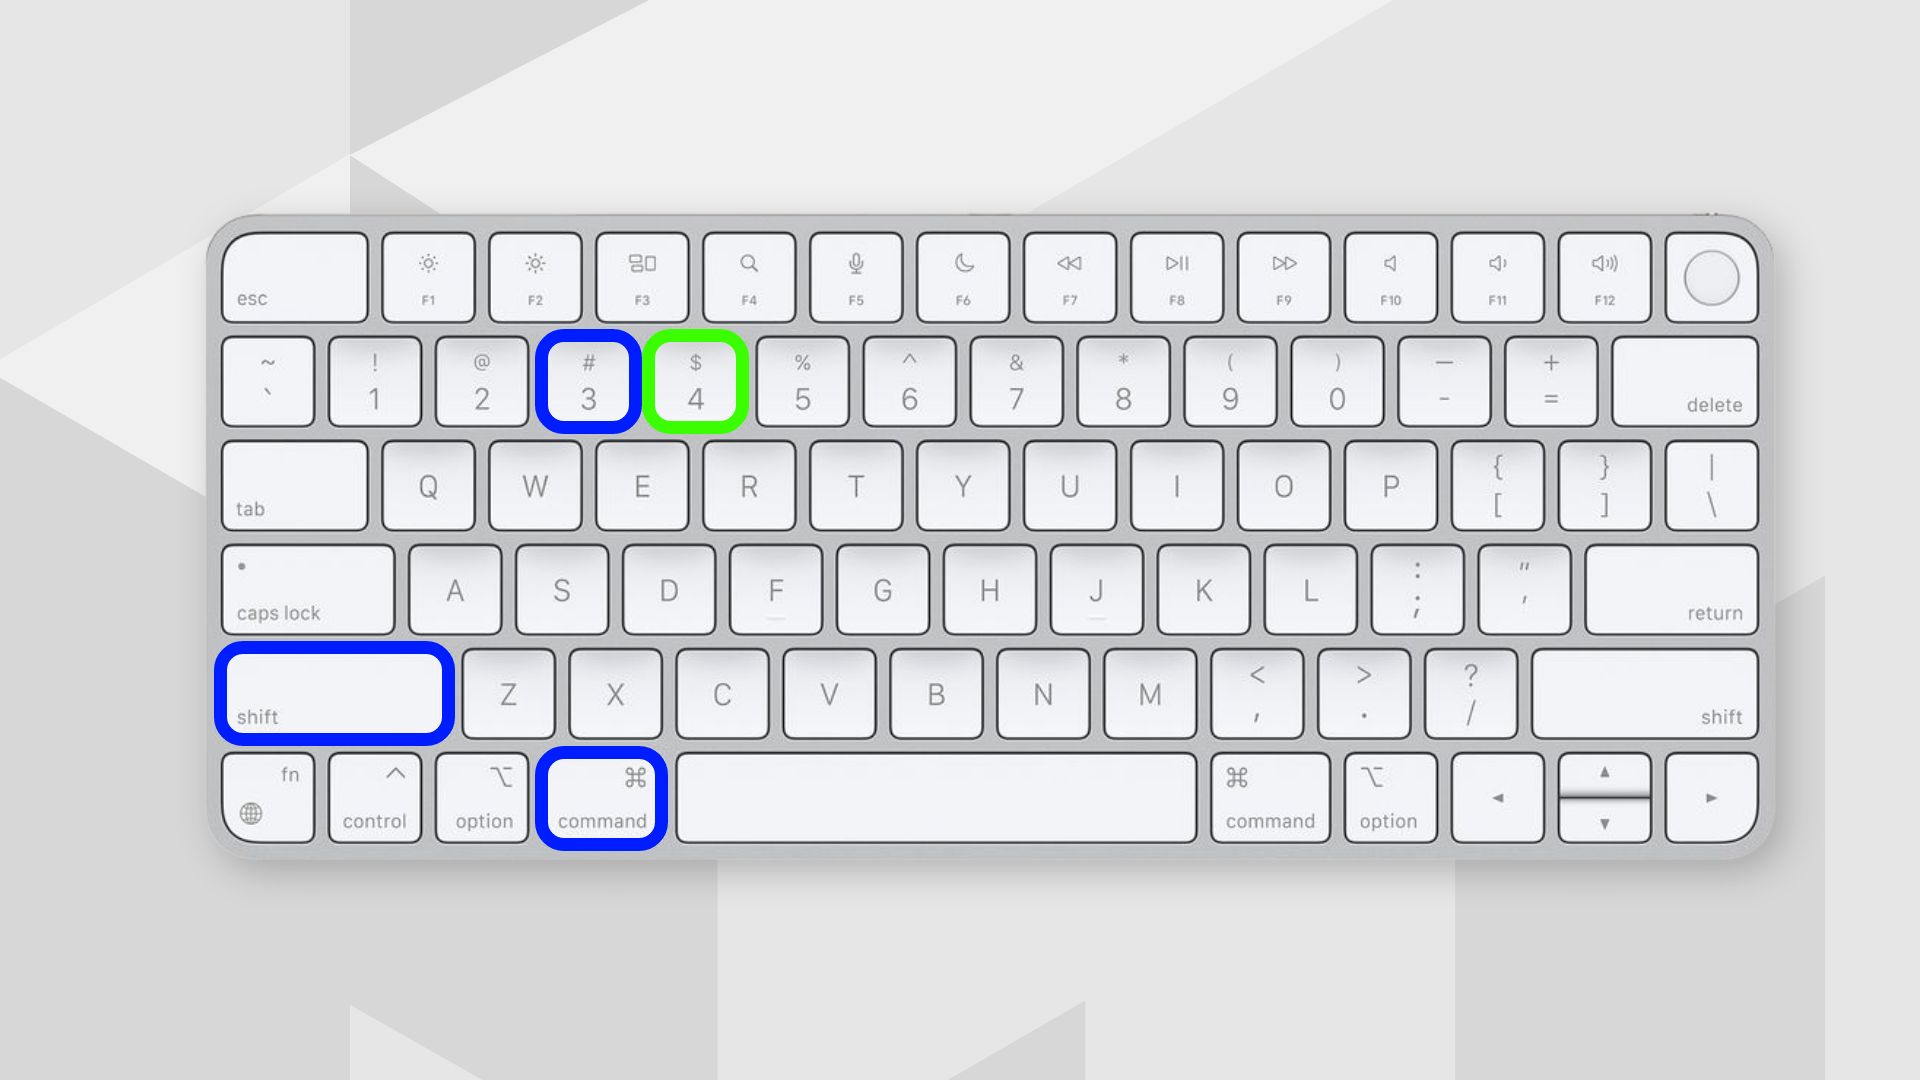
- With the window open on your Mac, press Shift, Command, and 3 together.
- A floating thumbnail should appear on the corner of the screen. Click on it to edit the screenshot. If you don’t need to edit it, wait for it to disappear and automatically save on your desktop.
how to capture part of a screen on a Mac
- If you’d like to capture a portion of the screen on your Mac, press Shift, Command, and 4 altogether.
- A crosshair icon (✛) will appear. Click and drag it to select the portion you want as a screenshot and release it when done.
- Once a floating thumbnail arrives with the preview, click on it if you need to modify it. If not, wait for the screenshot to save on the desktop.
How to change where screenshots are saved on Mac
If you want to change the default screenshot location on your Mac, which is the desktop, follow these steps—
- From the Finder app, go to Applications.
- Locate the Utilities folder and hit enter.
- From there, open the Screenshot app.
- Alternatively, you can press Shift + Command + 5 to open the Screenshot app directly.
- Once it is launched, a bottom menu will appear. Click on Options.
- You’ll see several location options under the “Saved to” menu. Choose any or choose “Other Location…” to select a saved folder manually.
How do I take a screenshot on my Mac?
On your keyboard, press Shift + Command + 3 to take a screenshot of the whole window on a MacBook. Similarly, to snap a portion of the screen, press Shift + Command + 4 together. Then click and drag the crosshair (✛) icon to select the portion and release it to save the screenshot.
Final words
We’ve explored all about how to delete screenshots on Mac, how to take a screen snap, and where to find them. Hopefully, this easy walkthrough will be helpful and make your MacBook using experience convenient and more accessible than ever.